Enter Planting Information
There are two ways to enter planting information in Taranis. The first is a seamless integration by connecting your John Deere Operations Center account to Taranis—this will automatically sync planting date, crop, hybrid, and row spacing. Learn More Here! The second option is to manually enter the information, which is outlined in the steps below.
Manual Entry Instructions: Step-by-Step Guide
- Log in to your Taranis account.
- Click on the Tools option in the main navigation bar.
- From the dropdown, choose Bulk Edit Growing Cycles.
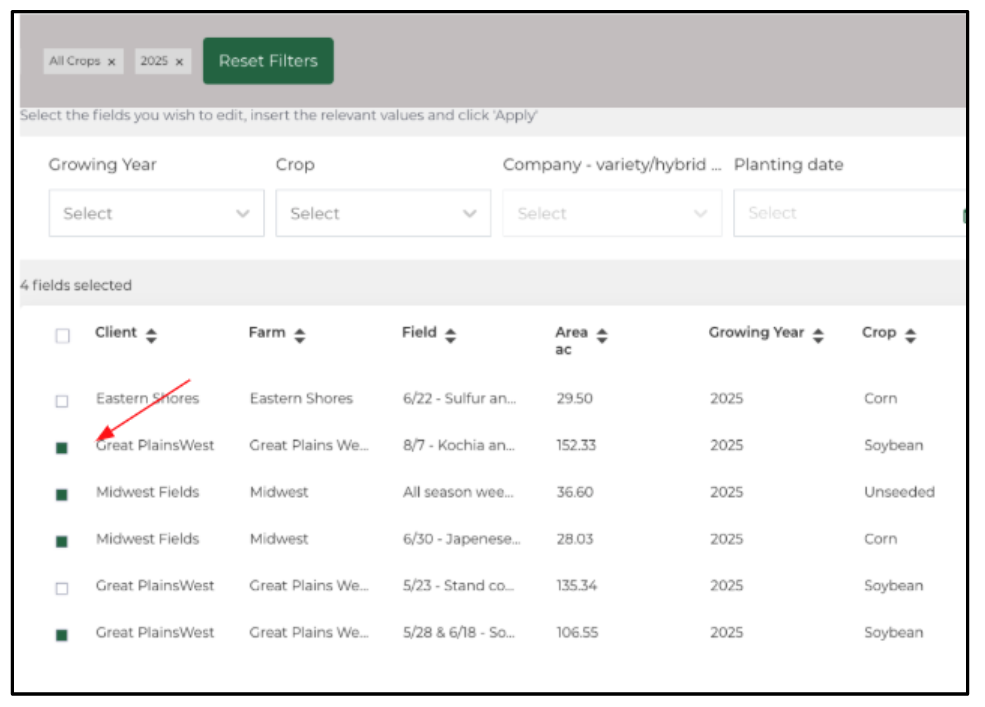
Choose Fields to Update
- A list of your fields will appear.
- Check the boxes next to the field(s) you want to update.
- Note: You can select multiple fields if they share the same planting information.
Select the Growing Year
- Click on the Growing Year dropdown menu.
- Select the appropriate year for the planting information.
Specify the Crop type
- Click on the Crop drop down menu.
- Choose the crop you planted from the list.
Enter Hybrid or Variety details
- In the Hybrid/Variety drop down menu, start typing the name of your crop/s hybrid or variety.
- A list of matching entries will appear.
- Select the correct hybrid or variety from the suggestions.
- If your hybrid or variety does not appear, please contact your Customer Success Representative for the addition.
Input the Planting Date
- Click into the Planting Date option and a calendar will pop up.
- Navigate to the correct month using the arrows, if necessary.
- Click on the specific day you planted.
Enter Planting Population
- Click on the Planting Population field.
- Type in the average number of plants per acre that you planted for the selected field(s).
Specify Row Spacing
- Click on the Row Spacing field.
- Enter the distance between rows in inches.
Apply the Information
- Once all the details are correctly entered, click on the Apply button.
- A confirmation prompt will appear.
- Click Yes, apply changes to save the information.
- Note: If the updated information doesn't display immediately, refresh your browser to ensure the changes take effect.
Related Articles
Track Missing Planting Dates
Keeping your planting data up to date is key to unlocking the full value of Taranis insights. Missing planting dates can delay missions or limit your ability to analyze stand counts, weed pressure, and more. Fortunately, it's easy to spot and fix ...Onboarding Checklist for Retail Customers
Ensure a smooth setup for new and returning customers Pre-Season Readiness Goals: Confirm all users have access. Ensure field boundaries are uploaded. Add fields to The Plan. Create a plan to enter planting information. Understand how to navigate the ...View Estimated Mission Dates
1. Click "Tools" 2. Click "Plans" 3. Click on the plan in the white space. Make sure to select the drone mission plan which will say AcreForward small above it. 4. Click which mission you are wanting to look at if you are curious about when those ...Onboarding Checklist for Growers
For a smooth setup and optimal use of Taranis insights. Pre-Season Readiness Goals: Verify all necessary fields and data are in the system before planting. Ensure access to the Web and Mobile apps before the first flights begin. Be prepared to ...Customer Success Onboarding Kit 2026 Growing Season